Accessing WordPress sites using SSH with 1Password and VS Code
It opens amazing doors for development

SSH access into my WordPress sites using 1Password and VS Code has become an indispensable part of my development workflow. In this post, I'll walk through my set up and why it's so valuable.
Prerequisites and assumptions
- A 1Password plan
- VS Code installed on your machine
- A WordPress host that allows SSH access and allows you to access site files directly in VS Code. If your host doesn't support VS Code access, this tutorial will still be valuable for learning how to use 1Password for managing SSH keys
- Basic familiarity with the command line
Why this matters
SSH keys are not kept in local storage
Keeping the SSH keys in 1Password mean they live in my encrypted vault—just like the rest of my passwords. This provides an extra layer of security versus keeping keys on my local hard drive. Every time I SSH into a site using 1Password, I'm required to authenticate the access, which keeps things safe and secure.
Besides the security benefits, keeping my SSH keys in 1Password means that I'm makes it easier to SSH into a site from different machines as long as I have 1Password installed.
Speed and precision to use WP-CLI
Accessing WordPress via SSH allows makes it possible to execute commands on your site using WP-CLI, which is often faster and far more precise than having to navigate WP Admin. I can clear my caches(s), create and delete posts, install/activate/deactivate/delete plugins and more. WP-CLI provides a command line interface for virtually everything you can do in WP Admin.
A secure back door access safety net
Ever gotten locked out of a WordPress site due to a password issue or a critical error screen? Accessing your WordPress site via SSH provides a backdoor that isn't affected by the standard /wp-admin login screen or plugin errors. If, for example, a new plugin takes down the entire site, it's easy to list all the plugins using wp plugin list and then use wp plugin deactivate plugin-slug-here to take it out of the mix.
Having a secure back door access safety net gives me peace of mind when working on my sites. I can troubleshoot and fix things in a way that the GUI doesn't provide, and that helps me develop with confidence.
Editing code directly with syntax highlighting and a best-in-class IDE
If you want to edit WordPress theme files locally, you either need to download the file with an SFTP program like FileZilla (and then re-upload changes), or you need to be working on a site locally, which involves setting up a local development environment or using an app like DevKinsta, LocalWP, or Studio. None of these option are ideal, especially when you need to share your work as you're working on it or need to work on live sites.
In many cases, I've found that my projects go better when I eschew local development and just go straight to a staging environment on my host. By working on an environment that's configured just like my production environment will be, I have confidence that I won't encounter random gotchas when pushing to production.
WordPress provides a way to edit code files directly from the WordPress Dashboard, but it's ugly, it's clunky, and it's easy to break your site. Anyone who's tried to make a "quick edit/addition" to functions.php or style.css from the WordPress Dashboard has probably crashed a site or two.
Taking things a step further by SSH'ing into a site using VS Code instead of the terminal opens up several benefits, including:
- Syntax highlighting
- Error highlighting via VS Code plugins
- The ability to run git commands to track changes
- The option to point your favorite flavor of AI directly at your codebase for editing, commenting, and general help
VS Code also has a built-in terminal, so you can have your cake and eat it too. With one pane, you can run WP-CLI commands, and in another you can edit theme files to your heart's content.
How this set up works
As mentioned at the beginning of this post, there are many steps in getting this set up for the first time. Here's the gist:
- Use 1Password to generate SSH keys
- Add the public key to your hosting provider. I use Kinsta, but any host that allows a direct connection to the server with VS Code will work.
- Add the SSH key to my approved list of keys in the 1Password SSH agent config file
- Update my .config file with the server info
- Test SSH'ing into the site
- Connect to the site using VS Code
Let's take each of these in turn.
Use 1Password to generate SSH keys
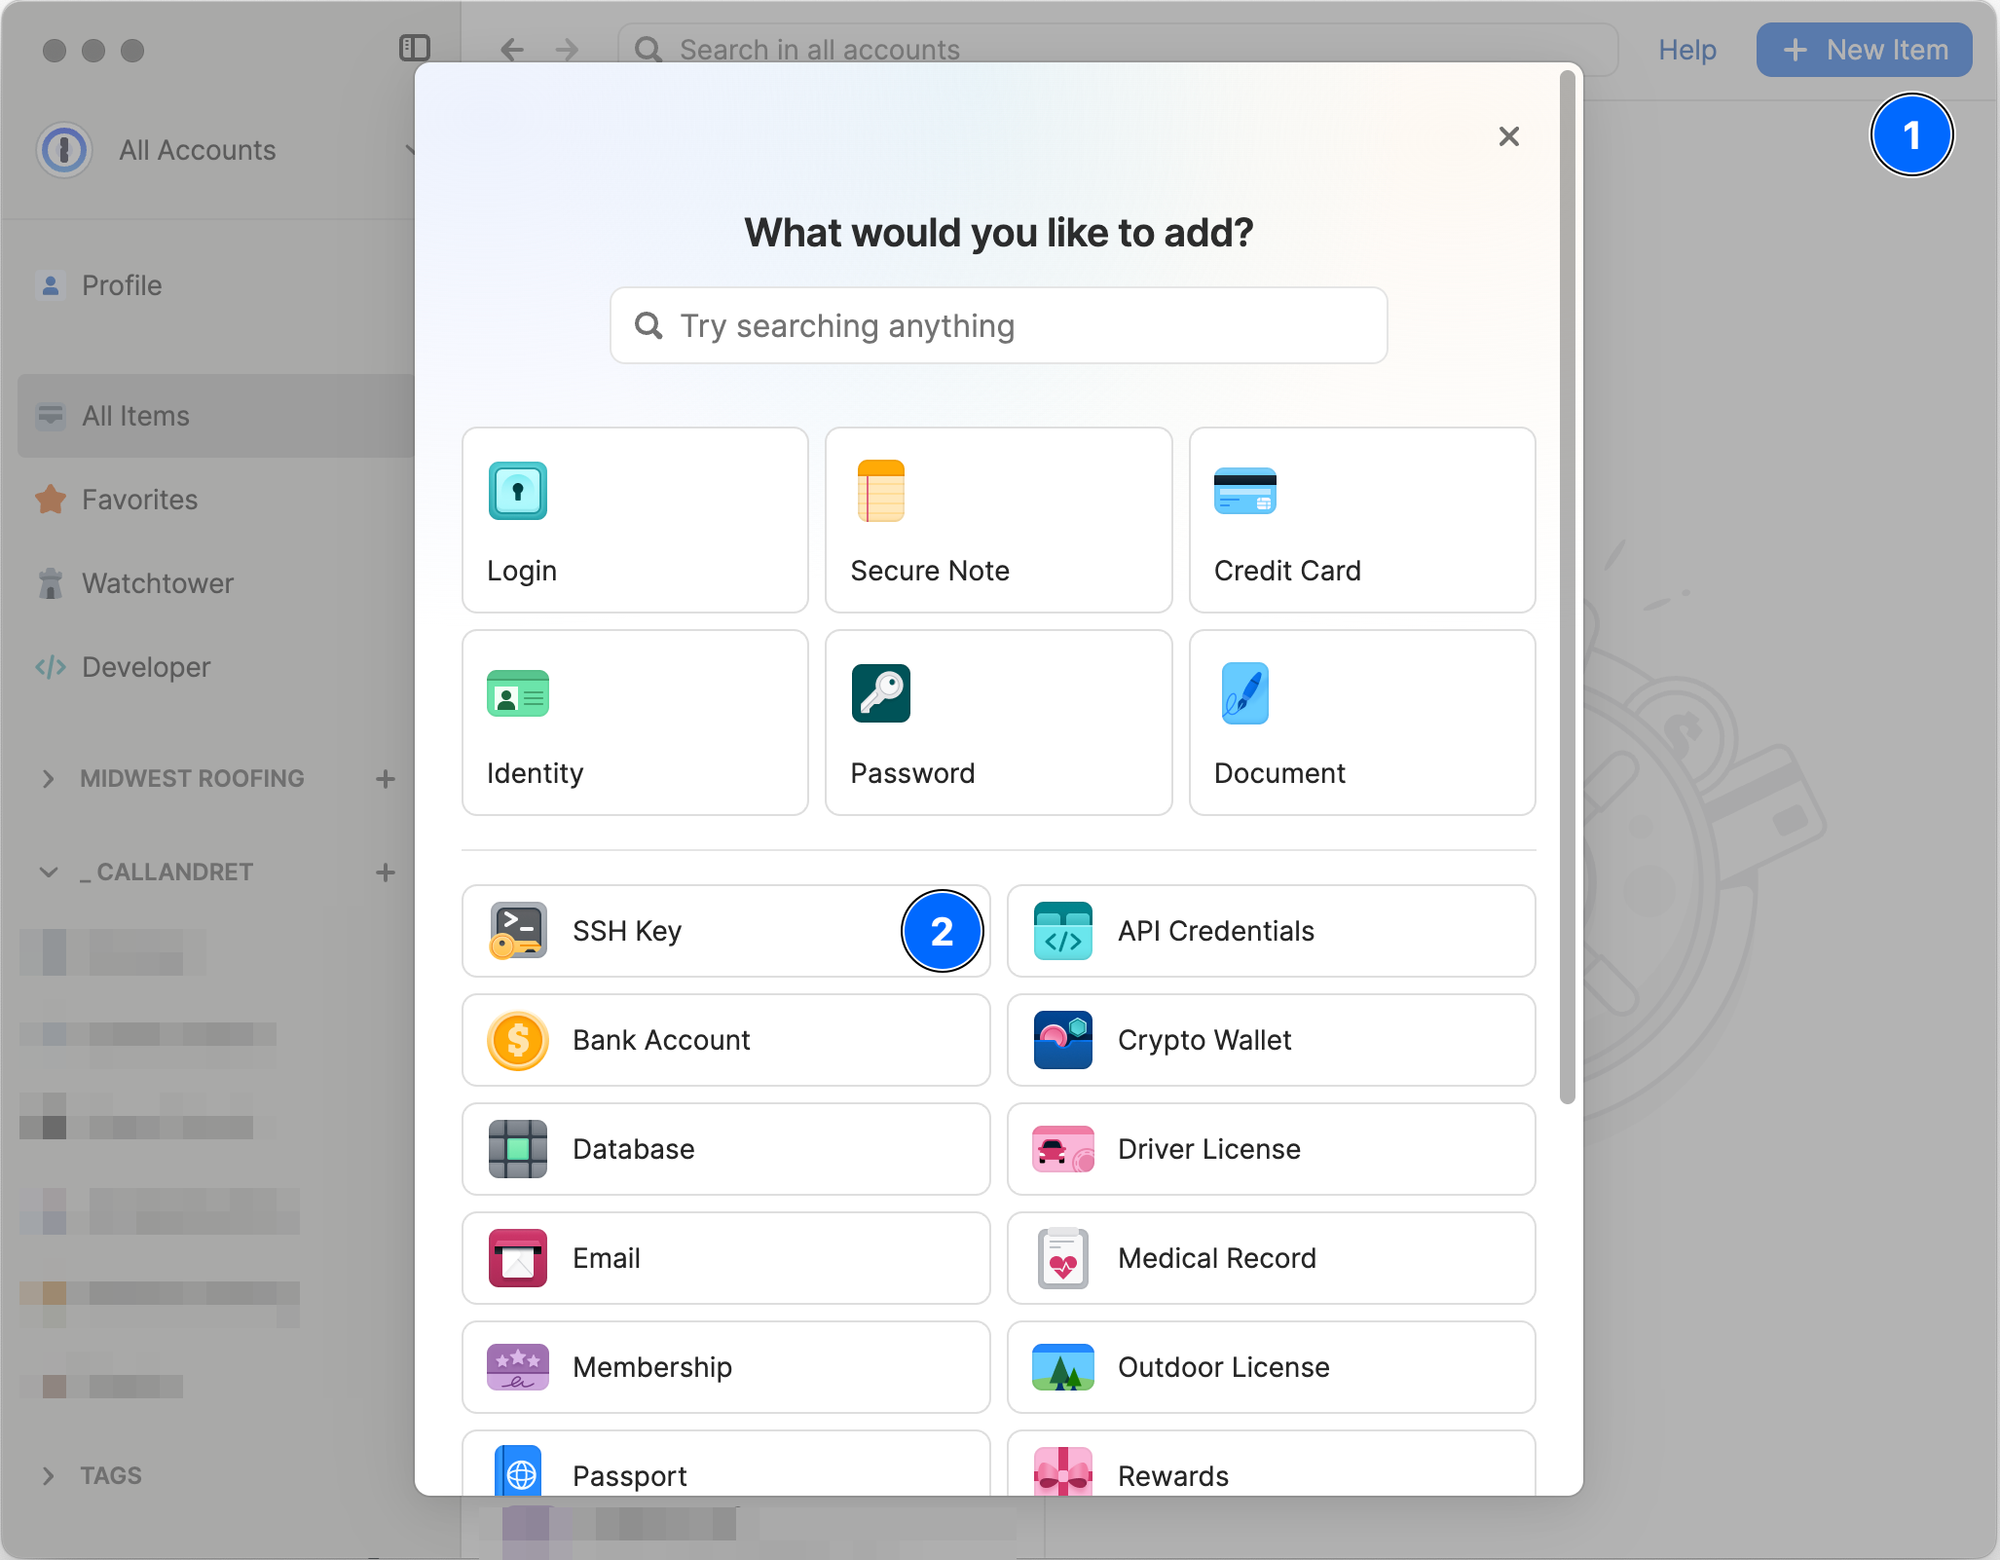
It's super easy to generate an SSH key in 1Password:
- Click on "New Item" and search for SSH
- In the New Item modal, click "Add Private Key" and "Generate a New Key"
1Password will create two keys:
- A private key that stays in 1Password—this is your unique key to access the site
- A public key that gets saved on the remote server.
The public and private keys are a pair. When you attempt to access the remote server (your WordPress host), the keys work together to authenticate the session. A crude analogy would be the lock on your front door: The keyhole is like the public key—it exists in the outside world. The private key is like your personal house key. When you insert the key into the lock, you're able to gain access.
A private key without a public key installed on a server is useless. A public key installed on a server without a private key means no access.
If you've already created keys via the ssh-keygen command, you can find those files and drop them into 1Password. This setup keeps all of your keys in an encrypted vault. Don't forget to delete your local keys after saving them in 1Password.
Add the public key to your hosting provider
Every host is different, so the best thing to do is search for "SSH access" in the documentation. Copy the public key and paste it where the documentation directs you to.
Add the SSH key to my approved list of keys in the 1Password SSH agent config file
This is arguably the most confusing part of the process, but it's essential for getting the setup working. Saving the keys in 1Password doesn't automatically allow the 1Password SSH agent to use them. This is how the 1Password docs explain the SSH agent:
The 1Password SSH agent uses the SSH keys you have saved in 1Password to seamlessly integrate with your Git and SSH workflows. It authenticates your Git and SSH clients without those clients ever being able to read your private key.
In fact, your private key never even leaves the 1Password app. The SSH agent works with the SSH keys stored in 1Password, but never without your consent. Only SSH clients you explicitly authorize will be able to use your SSH keys until 1Password locks.
In short, there are two key steps here:
- Configuring your machine to use 1Password for SSH identities
- Updating a 1Password TOML file that tells 1Password which keys it can use for SSH authentication. The syntax confused me at first, but it's simple once you understand the structure
The 1Password docs provide more detail on this process, and it's best to reference these docs in order since the instructions will remain up to date:
Update my .config file with the server info
There are three different config file edits being made at this point:
- Updating
~/.ssh/configto use 1Password for SSH identities - Editing
~/.config/1Password/ssh/agent.tomlto tell 1Password which SSH keys the agent has access to - Updating
~/.ssh/configagain with the specific server info for the remote host you want to access
You can add as many keys to the agent.toml file as you'd like, and you can add as many hosts to the ~/.ssh/config file as you'd like.
Once you've done step 1 here, you just repeat steps 2 and three for all other keys and hosts.
Here's the basic structure for the host info that you need to add to ~/.ssh/config:
Host YourServerName
	HostName 192.168.1.1
	User username-provided-by-server
	Port 15824
Copy this info from you hosting provider. The Host can be whatever you want it to be. I like to keep it descriptive so it's easy to type when connecting to the remote server. Consider:
- MidwestRoofing-Prod for my production environment
- MidwestRoofing-Stg for my staging environment
- Midwest-Roofing-Dev for my premium staging environment (which has resource parity with Prod)
Save your ~/.ssh/config file and you're ready to test!
Test SSH'ing into the site
This is the moment of truth. Open up a new terminal window and type:
ssh YourServerName
In my case, I'll type in ssh MidwestRoofing-Prod
If everything is configured properly, 1Password will pop up with a request for authentication, which you can do by entering your primary password or using TouchID if you have that set up.
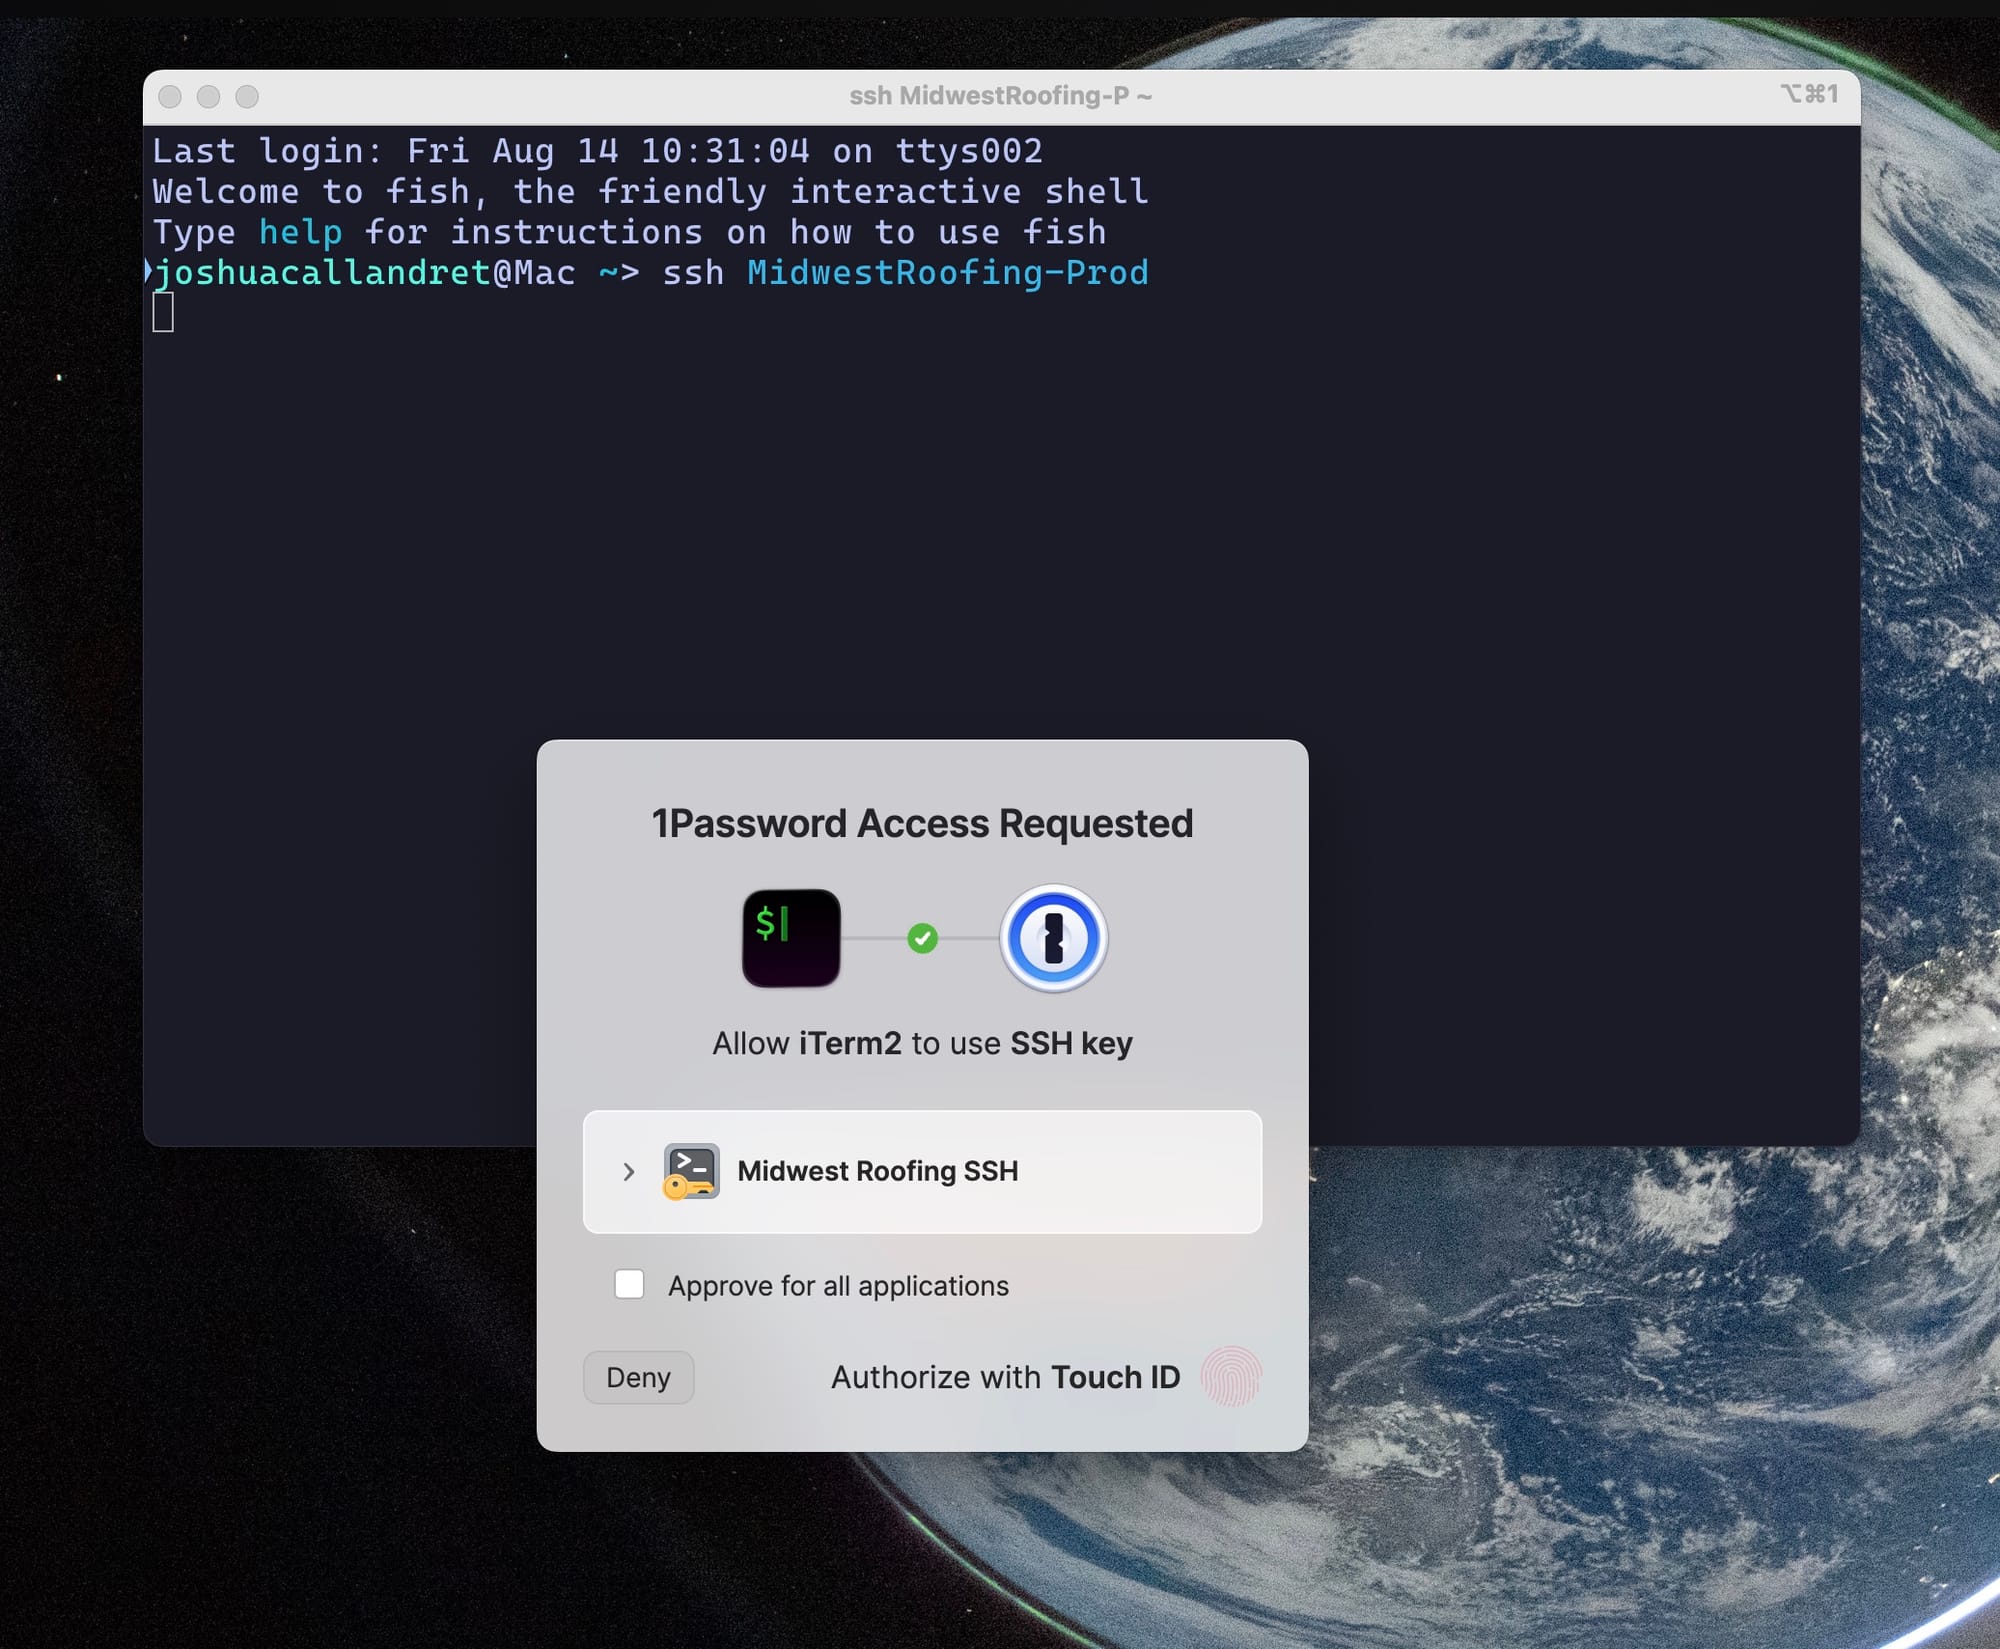
Your terminal should indicate that you're connected to the remote server, like this:
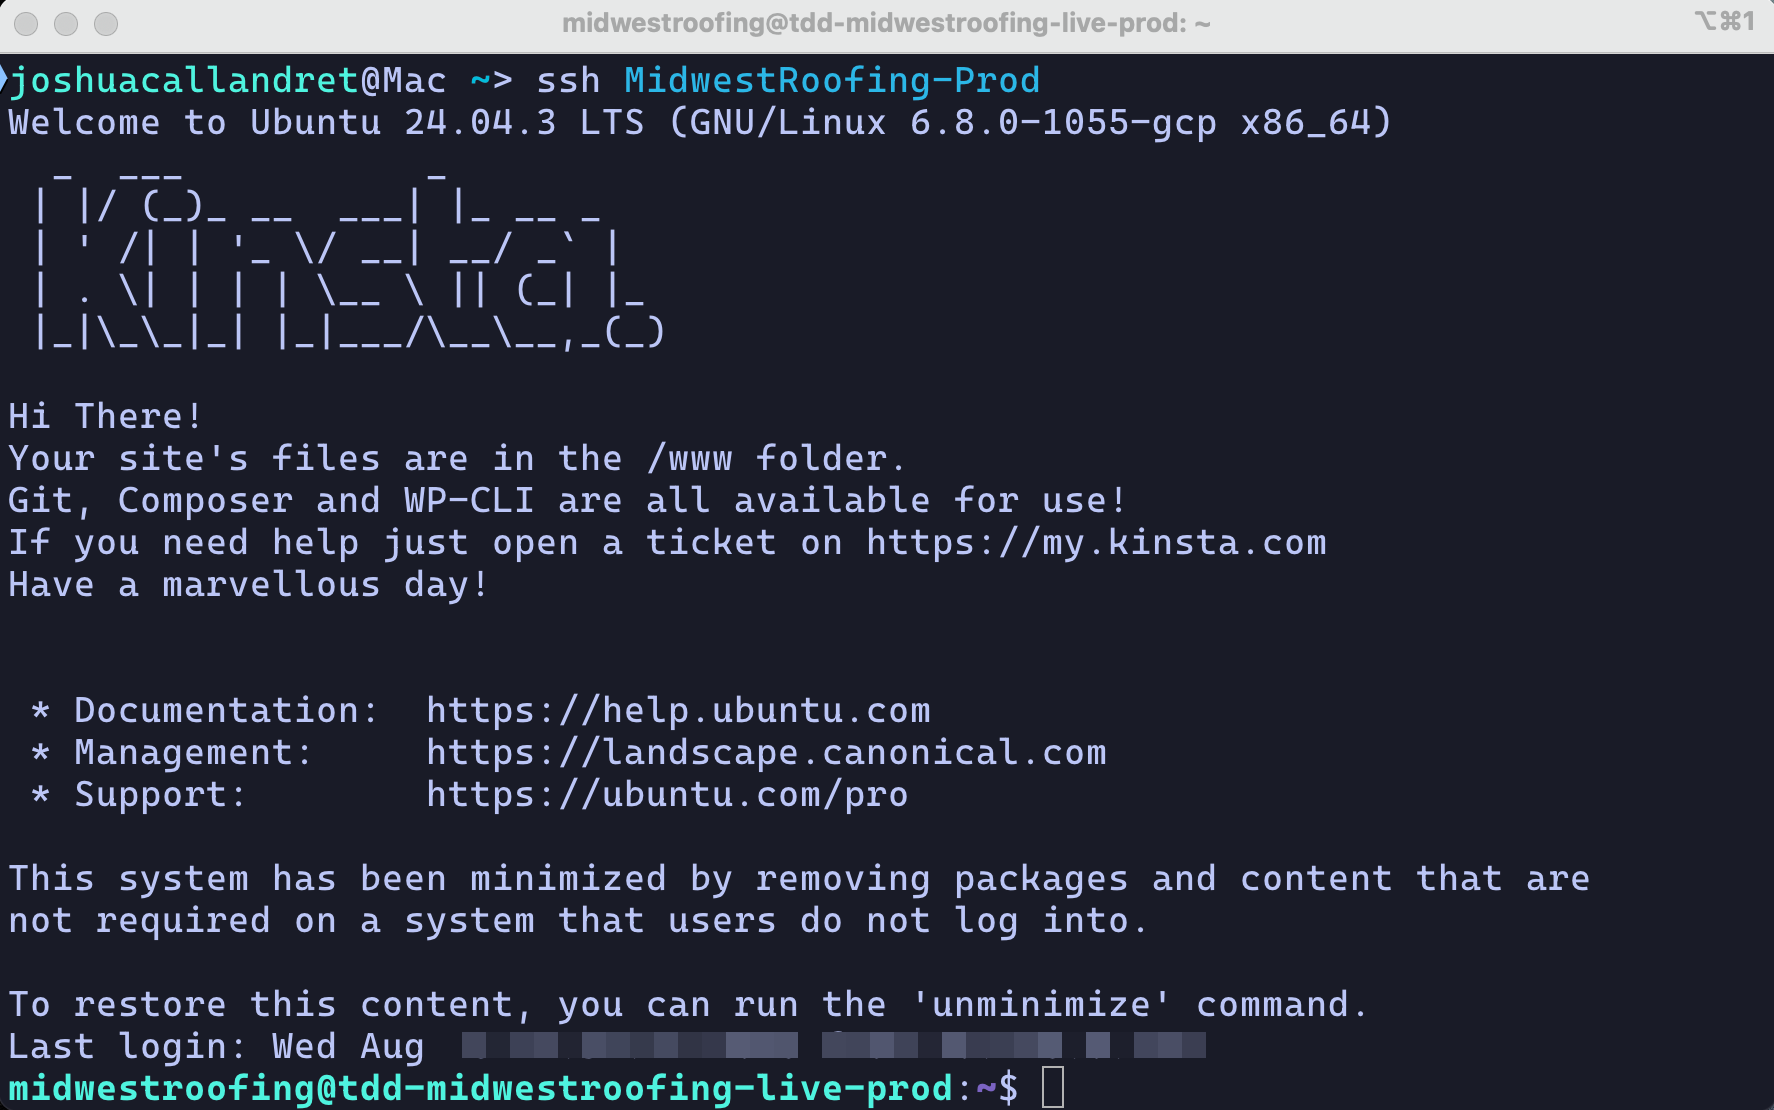
If you receive an error or 1Password doesn't prompt you to authenticate, here's what you should check:
- Double check that you've added your public SSH key to your host
- Check to make sure your host information is copied/pasted exactly in the
~/.ssh/configfile - Make sure the
agent.tomlfile provides the 1Password SSH agent access to your key (this has been the main gotcha for me when adding a new site) - Make sure your
~/.ssh/configfile contains this line:
Host *
	IdentityAgent "~/Library/Group Containers/2BUA8C4S2C.com.1password/t/agent.sock"
Connect to the site using VS Code
This is where the rubber meets the road and all the key generation, copying/pasting, and configuring really pays off.
Open up a new VS Code window, and click "Connect Current Window to Host...". I prefer to connect in the same window that I have open. VS Code should recognize the site you've added to your ~/.ssh/config file, and you can click on it to connect.
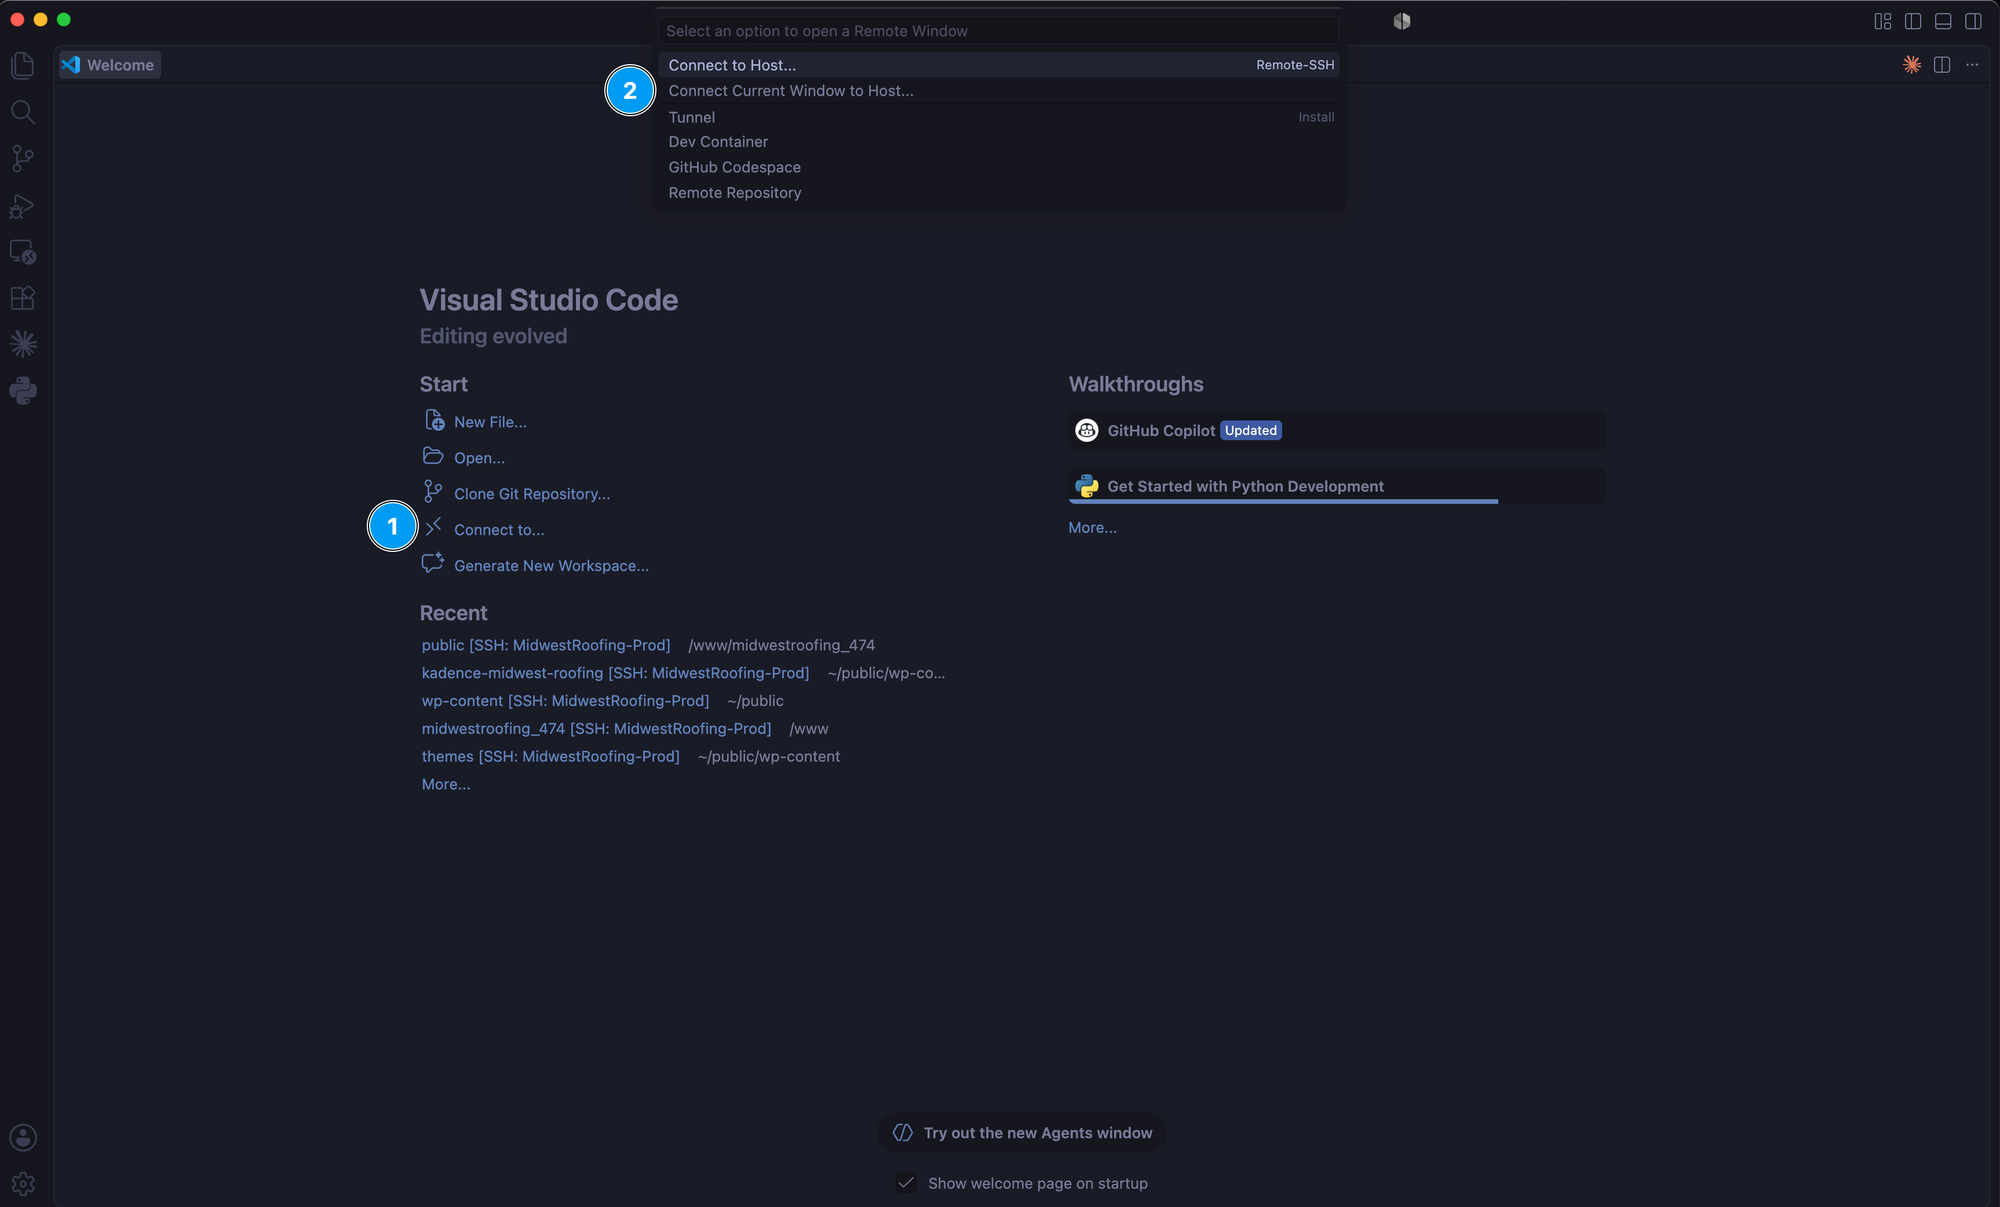
Just as in the quick terminal test, a 1Password popup should appear for you to authenticate. Once you do that, VS Code will connect directly to your site. At first, it will look like nothing has happened because you are in the top-level folder. Check the bottom left hand corner of the window, to see if you're connected.
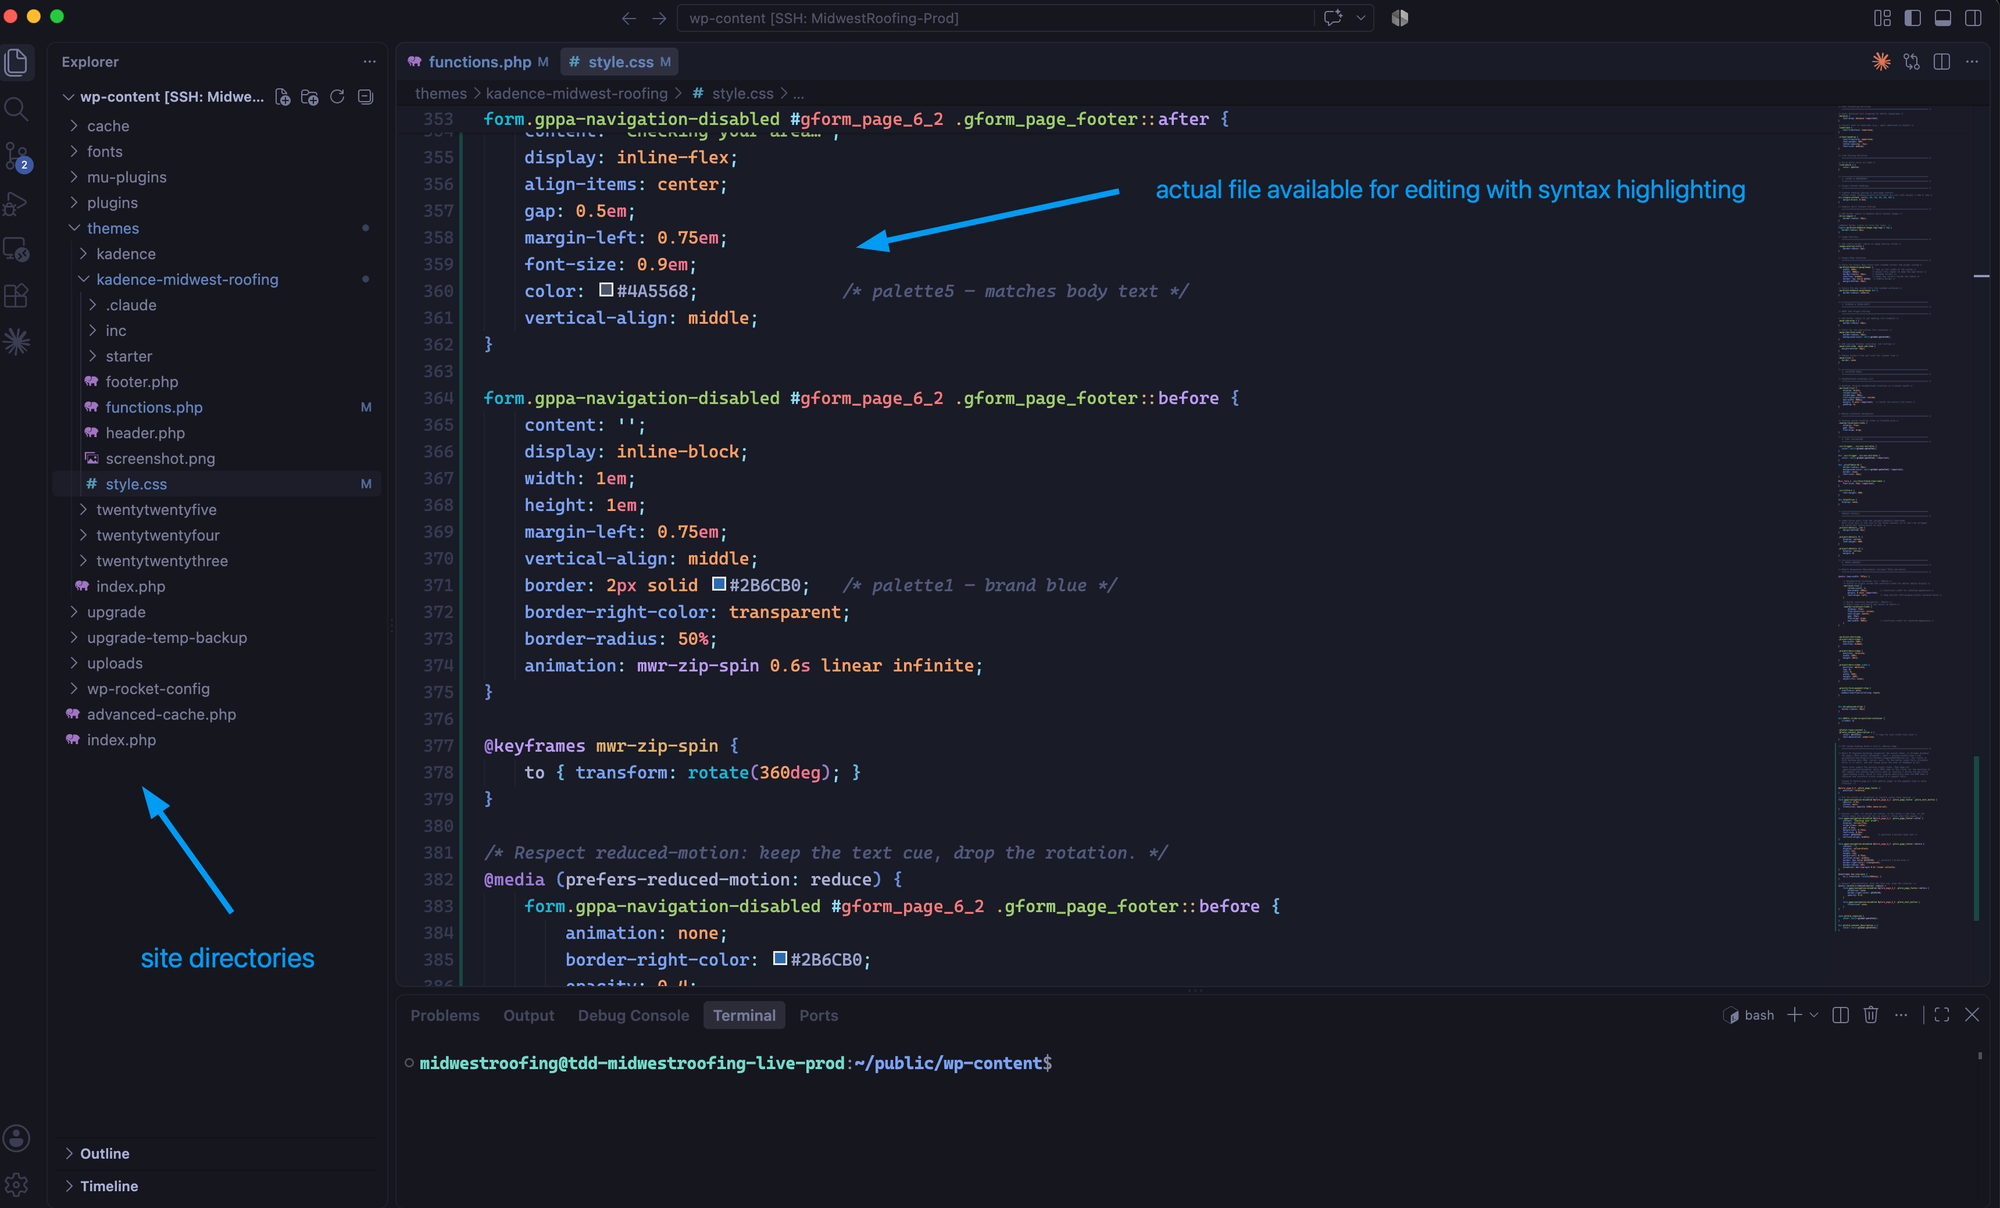
Once you've successfully connected, you'll be able to navigate the folder structure of your site. Click the search bar at the top to see a list of all the folder in the current directory. When I'm working on a WordPress site, I typically work in /wp-content or I drill down into wp-content/themes/my-child-theme Select the folder you want, and that directory and all its content will appear in the file explorer in the left hand sidebar.
And voila! You can open up all of your site's files and edit them directly in VS Code. You can also open up a terminal window in the bottom panel to run commands. I use it all the time to clear my cache while making edits.
Troubleshooting and final thoughts
If you run into any issues related to 1Password, be sure to check out their official documentation. I've gone through this process several times, and I still reference the syntax for updating the agent.toml file every time.
If you can access your site via the terminal and not via VS Code, reach out to your host and see if they allow it. As previously mentioned, this works on Kinsta but not on Siteground and there are a bazillion hosts so YMMV. I think the effort of this setup is still worth it just to have SSH access to WordPress sites via the terminal
Figuring out how to implement this authentication workflow has changed how I develop on WordPress, and I hope it helps you too! Having direct access to the code in VS Code makes it so much easier to do the things I need to do on a regular basis.
As always, be wise, use a child theme, and be sure to save your changes!
Thanks for reading!